Thursday, November 15, 2007

Learn ASP.NET

What is ASP.NET?

ASP.NET is a technology for creating dynamic Web applications. It is part of the .NET Framework; you can author ASP.NET applications in most .NET compatible languages, including Visual Basic, C#, and J#. ASP.NET pages (Web Forms) are compiled, providing better performance than with scripting languages. Web Forms allow you to build powerful forms-based Web pages. When building these pages, you can use ASP.NET server controls to create common UI elements, and program them for common tasks. These controls allow you to rapidly build a Web Form out of reusable built-in or custom components, simplifying the code of a page.

ASP.NET combines unprecedented developer productivity with performance, reliability, and deployment.

1.Developer Productivity

a.Easy Programming Model.
ASP.NET makes building real world Web applications dramatically easier. ASP.NET server controls enable an HTML-like style of declarative programming that let you build great pages with far less code than with classic ASP. Displaying data, validating user input, and uploading files are all amazingly easy. Best of all, ASP.NET pages work in all browsers -- including Netscape, Opera, AOL, and Internet Explorer.

b.Flexible Language Options
ASP.NET now supports more than 25 .NET languages (including built-in support for VB.NET, C#, and JScript.NET -- no tool required).
c.Great Tool Support.
VS.NET provides integrated support for debugging and deploying ASP.NET Web applications.
d.Rich Class Framework.
The .NET Framework offers over 4500 classes that encapsulate rich functionality like XML, data access, file upload, regular expressions, image generation, performance monitoring and logging, transactions, message queuing, SMTP mail, and much more!

2.Improved Performance and Scalability
a.
Compiled execution.
ASP.NET will automatically detect any changes, dynamically compile the files if needed, and store the compiled results to reuse for subsequent requests. Dynamic compilation ensures that your application is always up to date, and compiled execution makes it fast.

b.Rich output caching.
ASP.NET output caching can dramatically improve the performance and scalability of your application. When output caching is enabled on a page, ASP.NET executes the page just once, and saves the result in memory in addition to sending it to the user. When another user requests the same page, ASP.NET serves the cached result from memory without re-executing the page. Output caching is configurable, and can be used to cache individual regions or an entire page. Output caching can dramatically improve the performance of data-driven pages by eliminating the need to query the database on every request.

c.Web-Farm Session State.
ASP.NET session state lets you share session data user-specific state values across all machines in your Web farm. Now a user can hit different servers in the web farm over multiple requests and still have full access to her session. And since business components created with the .NET Framework are free-threaded, you no longer need to worry about thread affinity.

3.Enhanced Reliability
ASP.NET ensures that your application is always available to your users.

Memory Leak, DeadLock and Crash Protection. ASP.NET automatically detects and recovers from errors like deadlocks and memory leaks to ensure your application is always available to your users.
Google Android

What is Android?

Android is a software stack for mobile devices that includes an operating system, middleware and key applications. This early look at the Android SDK provides the tools and APIs necessary to begin developing applications on the Android platform using the Java programming language.

Features

  • Application framework enabling reuse and replacement of components
  • Dalvik virtual machine optimized for mobile devices
  • Integrated browser based on the open source WebKit engine
  • Optimized graphics powered by a custom 2D graphics library; 3D graphics based on the OpenGL ES 1.0 specification (hardware acceleration optional)
  • SQLite for structured data storage
  • Media support for common audio, video, and still image formats (MPEG4, H.264, MP3, AAC, AMR, JPG, PNG, GIF)
  • GSM Telephony (hardware dependent)
  • Bluetooth, EDGE, 3G, and WiFi (hardware dependent)
  • Camera, GPS, compass, and accelerometer (hardware dependent)
  • Rich development environment including a device emulator, tools for debugging, memory and performance profiling, and a plugin for the Eclipse IDE

Android Architecture

The following diagram shows the major components of the Android operating system. Each section is described in more detail below.

Applications

Android will ship with a set of core applications including an email client, SMS program, calendar, maps, browser, contacts, and others. All applications are written using the Java programming language.

Application Framework

Developers have full access to the same framework APIs used by the core applications. The application architecture is designed to simplify the reuse of components; any application can publish its capabilities and any other application may then make use of those capabilities (subject to security constraints enforced by the framework). This same mechanism allows components to be replaced by the user.

Underlying all applications is a set of services and systems, including:

  • A rich and extensible set of Views that can be used to build an application, including lists, grids, text boxes, buttons, and even an embeddable web browser
  • Content Providers that enable applications to access data from other applications (such as Contacts), or to share their own data
  • A Resource Manager, providing access to non-code resources such as localized strings, graphics, and layout files
  • A Notification Manager that enables all applications to display custom alerts in the status bar
  • An Activity Manager that manages the lifecycle of applications and provides a common navigation backstack

For more details and a walkthrough of an application, see Writing an Android Application.

Libraries

Android includes a set of C/C++ libraries used by various components of the Android system. These capabilities are exposed to developers through the Android application framework. Some of the core libraries are listed below:

  • System C library - a BSD-derived implementation of the standard C system library (libc), tuned for embedded Linux-based devices
  • Media Libraries - based on PacketVideo's OpenCORE; the libraries support playback and recording of many popular audio and video formats, as well as static image files, including MPEG4, H.264, MP3, AAC, AMR, JPG, and PNG
  • Surface Manager - manages access to the display subsystem and seamlessly composites 2D and 3D graphic layers from multiple applications
  • LibWebCore - a modern web browser engine which powers both the Android browser and an embeddable web view
  • SGL - the underlying 2D graphics engine
  • 3D libraries - an implementation based on OpenGL ES 1.0 APIs; the libraries use either hardware 3D acceleration (where available) or the included, highly optimized 3D software rasterizer
  • FreeType - bitmap and vector font rendering
  • SQLite - a powerful and lightweight relational database engine available to all applications

Android Runtime

Android includes a set of core libraries that provides most of the functionality available in the core libraries of the Java programming language.

Every Android application runs in its own process, with its own instance of the Dalvik virtual machine. Dalvik has been written so that a device can run multiple VMs efficiently. The Dalvik VM executes files in the Dalvik Executable (.dex) format which is optimized for minimal memory footprint. The VM is register-based, and runs classes compiled by a Java language compiler that have been transformed into the .dex format by the included "dx" tool.

The Dalvik VM relies on the Linux kernel for underlying functionality such as threading and low-level memory management.

Linux Kernel

Android relies on Linux version 2.6 for core system services such as security, memory management, process management, network stack, and driver model. The kernel also acts as an abstraction layer between the hardware and the rest of the software stack.

Wednesday, November 14, 2007

Blackberry Development Using NetBeans Mobility Pack

With the RIM Blackberry JDE 4.1, you can now build Java ME applications for Blackberry devices using NetBeans Mobility Pack for CLDC/MIDP 5.5.

Requirements

Before you begin, you need to install the following software on your computer:

Setting Up for BlackBerry Development

To set up your NetBeans IDE for Blackberry development, you need to add the Blackberry JDE as a custom platform emulator because there are utilities distributed with the JDE that are not distributed with its emulators.

To do this, you perform three steps:

  1. Add the RIM Blackberry JDE as a custom emulator
  2. Create a Blackberry project
  3. Set the Blackberry as the default device emulator

Adding the RIM Blackberry JDE as a Custom Emulator

To begin, you must register the RIM Blackberry emulator using the Java Platform Manager:

  1. Select Tools > Java Platform Manager from the top navigation bar.
  2. Click the Add Platform button.
  3. Select Custom Java Micro Edition Platform Emulator. Click Next.
  4. The Platform Home should be JDE installation directory (C:\Program Files\Research In Motion\BlackBerry JDE 4.1.0).
  5. You can enter whatever you want for the Platform Name.
  6. Set Device Name to one of the supported devices: 7100g, 7100r, 7100t, 7100v, 7100x, 7250, 7290, 7520,
  7. Keep the Preverify Command as it is.
  8. Modify the Execution and Debugger Commands as shown:
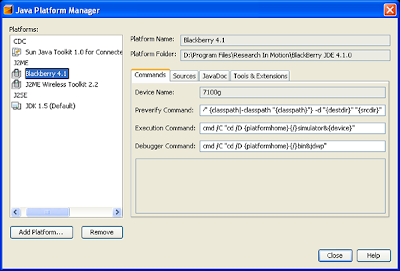
    • Execution Command: cmd /C "cd /D {platformhome}{/}simulator&{device}"
    • Debugger Command: cmd /C "cd /D {platformhome}{/}bin&jdwp"
    Click Next.
  9. The Bootstrap Libraries panel displays a long list of jar files. Select all of the listed files except net_rim_api.jar and click Remove. Click Next.
    Note: If the net_rim_api.jar is not in the list, Click the Add button, and type in or navigate to C:\Program Files\Research In Motion\blackberry JDE 4.1.0\lib\net_rim_api.jar and click Open.
    Then click Next.
  10. In the Sources and JavaDoc panel, click the Add button next to the JavaDoc window and type in or navigate to: C:\Program Files\Research In Motion\BlackBerry JDE 4.1.0\docs\api\. The Java Platform Manager should look like the following graphic:

Click Finish, then click Close.

Creating a Blackberry Project

Next, you create a project for your application:

  1. Choose File > New Project.
  2. Under Categories, choose Mobile. Under Projects, choose Mobile Application. click Next.
  3. Give the project a name, for example MobileApplication2.
    If you do not want a sample MIDlet created for your project, uncheck the "Create Hello MIDlet" check box.
  4. Click Finish to create the Project.
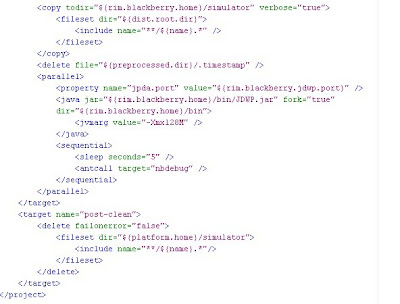
  5. Select the Files Tab in the Explorer window and open the project's build.xml file. Add this (below Image)fragment of code right before the tag at the bottom of the file.
  6. If you would like to extend net.rim.device.api.ui.UiApplication instead of standard MIDlets in your project, then:
  • Remove the highlighted argument line from the build.xml script above.
  • Ignore the warnings in Project Properties / Application Descriptor / MIDlets category when adding a class that does not extend MIDlet.
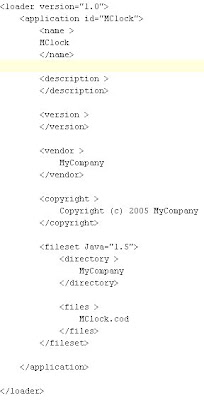
7. From the Files tab, create a new Empty file, called .alx, and save it into your project folder (on the same level as build.xml!) with the content(below Image). Change the names of course to reflect your application. This is a special file required by Blackberry devices to identify the application details.

Set the Blackberry as the Default Device Emulator

Now you're ready to set the default configuration to emulate a Blackberry device:

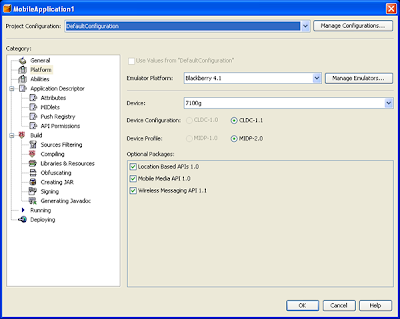
  1. Right-click on the project and choose Properties.
  2. In the Platform Properties:
    • Choose Blackberry 4.1 from the Emulator Platform drop-down menu.
    • Choose the Blackberry device emulator from the Device drop-down menu.

At this point, you are ready to write code, build, run, execute, and debug your MIDlet for the BlackBerry.

Note: Once you build your project and the emulator launches, you will need to scroll to the icon for your application, which will be on the main phone screen when the emulator comes up. You can use the arrow keys or click the scroll wheel on the emulator image to navigate to your application icon.